Welding Assembly:
The Order of Events
There will be some projects that you do, that you'll need to
consider the welding assembly order.
* Some things will be EXTRA difficult if you assemble
something at the wrong time.
* Some things won't even fit: As an example, an internal
roll cage for your hot rod, unless it's a "topless" type.
Granted, many jobs that you'll do, you can figure it out as you go along. Once in awhile you may HAVE TO do a lot of extra thinking and planning.
* At Weyerheauser there were several times that I had to do some
heavy planning before doing any material cutting or gathering. One example is having to build something from a blueprint!
* At home my biggest welding assembly example was the swing-set that I built for my kid. I spent lots of time figuring out design, what I needed, & FINDING enough materials to get it done.
I'll quickly go over one project from a picture obtained from
Flickr.
Then, I'll be covering some of the assembly process that I went through on the kid's swing-set.

Photo by: "jakesmome at flickr.com"
Although there are quite a few pieces to this project, it
wouldn't be too hard to figure out a welding assembly order:
* I would first build the frame for the part she's standing on.
Then add the metal grating.
* Add the tubing pieces for the hand-rail sections to sit in.
* I'd add "kickplates" at the bottom to prevent over-stepping.
* Completely build each hand-rail section & put them in place.
* Then I'd take apart the upper & lower pieces, & place the base & rail sections wherever they need to go permanently.
* Re-assemble & then paint.
You could vary some of the above steps & still get it done
OK.
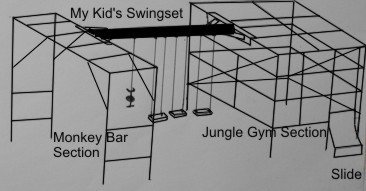
And now the welding assembly order for the swing-set!
* Note that some of the longer pieces needed to be made up of
shorter pieces welded together. MOST of the material was free from my brother that converted his house water pipe to copper, then he gave me LOTS of pipe!
* The 12 foot 2" heavy-walled pipe for the swings I bought in one piece.
* The wood for the seats & the "glide swing" I bought.
* I also bought the stainless sheet metal for the slide.
* Lastly, I bought various angle iron as needed.
Note that because I built this by myself I needed to use a
certain order of events to get it done. With help, I may have done things differently.
Let's get this thing going!
1) I started the whole thing by assembling the vertical parts of the monkey bar section.
2) I placed those in concrete footings & let them set up.
3) Then I built the ladder shaped top of the monkey bars, then set them on top of the vertical parts. Then welded.
4) Then I welded up the left & the right vertical end-pieces of the jungle gym. (just 2 legs & a top piece for each), & set them in concrete.
5) Then I connected the tops together, just at the top corners.
6) Then I assembled the support piece for the swings, then placed it on top between the 2 sections. Then welded.
7) Then I put in pieces to support the slide.
8) Next I started putting in pipes all over the jungle gym
section.
9) Then I placed the slide, the swings, & the glider.
Done? No. Then it needed to be TESTED! All three of us (mom, dad, kid), started swinging & climbing around. That was FUN. But I decided to add knee bracing to the monkey bars & a couple of cross-braces on the jungle gym.
Then I verified that everything was complete as I wanted it, and began painting it.
It was used probably more by me & "mum" than by the kid! But the
neighbor kids LOVED it!
When we moved away from there, my friend & neighbor wanted me to torch it off the ground & give it to him! Which we did.
General information about it:
* Over-all it was 22 foot long & 8 foot wide.
* The jungle gym was 8 foot square & 7 foot high.
* The monkey bars were 7 foot high, 2 foot wide, & 8 foot long.
* The swing section was 12 foot long.
* The swing SEATS were 18" between the chains. I measured the
wife's rear to make SURE they would be OK for us all. I got in trouble for my asking her if I could measure her "width!"
In Summary:
* Welding assembly order can depend on how many pieces there
are.
* If things are really heavy, you may need to make smaller
sections, then weld them together after they're in place.
* If you're by yourself, you'll likely need to seriously think about an order of events!
Go to "Welding Project Problems" Page
Return to Arc Welding Order main page HOME